Tuesday, February 14, 2012
Baby Shower Pillow Cake
It has been a while since I have posted on my blog. I need to start posting, sharing, and baking more. I have had no motivation to do so until recently when I got an order for a baby shower cake. I was so proud of myself of how well it turned out, especially with the fondant covering the cake. I had a little extra help with The Mat made by Sweet Wise. The cake itself was white and pink marble, since the expectant mother is having a girl. The fondant baby is made by using a mold, made by First Impressions, that I purchased from Global Sugar Art. I used non toxic chalk to highlight the baby's hair and for shading. The flower work was made using the Wilton Nature and Fondant Gum Paste Mold and Button Flower Fondant Cut and Press Set. Needless to say there was no cake left after the party. I am happy the mother loved the cake.
Wednesday, November 2, 2011
Werewolf Cupcakes
These are werewolf cupcakes that were made for my son's Halloween party. They are vanilla cupcakes with brown tinted classic butter cream. Tip #18 was used to create the fur effect. The eyes are made with smarties and a dot of black butter cream. The nose is a chocolate chip.
Tuesday, September 6, 2011
Piggies Cake
This is the piggies cake I did yesterday for a lady that loves pigs. Chocolate cake with chocolate ganache filling, butter cream icing, and the piggies mud puddle is chocolate ganache too. Flowers, pigs, and sign is gum paste. Please enjoy and comments are always welcomed.
Labels:
butter cream,
cake,
ganache,
gum paste,
Pigs
Sunday, August 14, 2011
Fair Cake 2011


I did this cake for my county fair this year. I used a poured fondant, which I will probably never do again, because of the hassle, on a large cake. I thought the yellow color was amazing though. The flowers are my interpretation of a peony. I was pleased with them. Overall I am happy with placing second, but I know I can do much better. I just need to not wait until the last minute to do things.
Tuesday, July 19, 2011
For Sale Cricut Cake with 2 Cartridges
This is a used Cricut Cake. I have used it a total of eight times. I anticipated using the machine more, but I do more by hand. This Cricut Cake comes complete with the following: * Cricut Cake™ Personal Electronic Cutter* 3 (12 in x 12 in) food-safe cutting mats (used) * “Cake Basics” cartridge * "Elegant Cakes" cartridge * 2 stainless steel cutting blades * 1 power adapter * 1 cartridge skirt * 1 silicone keypad cover * 1 cartridge port cover * 1 stainless steel blade basket * 1 cleaning brush * User manual and DVD $180 free shipping Paypal accepted |
Sunday, July 17, 2011
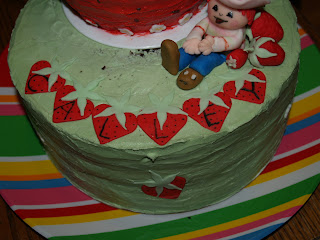
Strawberry Shortcake Cake
This cake was made for a little girl's third Birthday. I used the giant cupcake pan to make the strawberry house. Shortcake herself is made from gumpaste as well as the strawberries and flowers.

Tuesday, July 5, 2011
Monkey Birthday Cake

This cake was for a little boys first Birthday. I used a new technique, frozen buttercream transfer, for the sheet cake. The FBT worked out really well. It was simple and easy to do. The icing used for the transfer was great tasting, more buttery too. The recipe for doing a FBT:
1 cup Crisco 3 sticks butter (real butter, good quality) 2 Tsp flavoring (I use 1 Tsp clear vanilla, 1 Tsp butter flavoring) 2* pounds powdered sugar, sifted several times (I sift 5 times)
1. Cream butter and shortening
2. Add flavoring
3. Slowly add powder sugar
4. Mix on 8-10 speed for approximately 5-10 minutes for a smooth consistency. The length of time depends on the weather/atmosphere at your house.
*Add more sugar if not stiff enough, depending on the humidity where you are located.
Transfer Instructions
1. Choose a picture. Make sure that when you print the picture out use the mirror image function.
2. Tape picture to a stiff movable surface, such as a cake board. Then tape wax paper over your picture.
3. Pipe all the outlines on the picture in black using tip #2 or #1.
4. Now you need to start thinking of your picture in layers. Begin filling in the colors.
5. When completely filled in, use one solid color to cover the whole transfer. This will be like the base that the transfer will sit on.
6. Place another layer of wax paper on top and lightly push down on your transfer. Do not flatten the transfer. You are simply easing the piping lines together so they show up as a solid picture in your final picture.
7. Place in freezer overnight for best results.
8. Place on cake.
* Using a food safe paint brush can also help smooth out dimples or bumps in the frosting.
The cupcake toppers were made using my Cricut Imagine, Cake Basics Cartridge, and Create a Critter Cartridge.


Subscribe to:
Comments (Atom)


